Experiential Design / Task 3: Project MVP Prototype
Natalie Chu Jing Xuan, 0354589
Experiential Design, Bachelor of Design (Honours) in Creative Media
Task 3: Project MVP Prototype
Table of Contents
Module Information Booklet (MIB)
Fig.1 Module Information Booklet (MIB)
Task 3: Project MVP Prototype
Instructions:
Once their proposal is approved, the students will then work on the prototype of their project. The prototype will enable the students to discover certain limitations that they might have not learnt about before and they’ll have to creatively think on how to overcome the limitation to materialize their proposed ideas. The objective of this task is for the students to test out the key functionality of their project. The output may not necessarily be a finished visually designed project. The students will be gauge on their prototype functionality and their ability to creatively think on alternatives to achieve the desired outcome.
Requirements:
- Screen Design visual prototype (Figma)
- Functioning MVP of the App Experience
Submission:
- Video walkthrough and presentation of the prototype
- Online posts in your E-portfolio as your reflective studies
Fig.2.1 Proposal Document
Fig.2.2 Proposal Slide
Figma Process
In our Figma prototype, we added an Onboarding Page and a Home Page. We also refined the Mini Quizzes section to improve clarity and interactivity.
Below is our refined Figma prototype and Figma File:
Fig.3.1 Figma Prototype
Fig.3.2 Figma File
Task Delegation
For this assignment, we divided the work based on the two core features of our application:
- AR Camera: Scan and Learn
- Mini Quizzes
Each team member was responsible for different scenes within the app:
- Natalie Chu Jing Xuan (me) – Responsible for the OnboardingScene, HomeScene, and ARScene, which cover the user’s first interaction with the app and the main AR functionality.
- Chan Xiang Lam – Responsible for QuizScene, QuizScene2, QuizScene3, and CompleteScene, which focus on the quiz experience and final results screen.
This clear delegation allowed us to focus on specific areas and ensure smooth integration between scenes.
Unity Process (My Part: AR Camera)
After creating a new project in Unity, I proceeded to set up Vuforia by adding a new license key titled AR WonderWords and creating an Image Target named TigerCard.

|
| Fig.4.1 Vuforia License (left) and Image Target (right) |
Next, I imported the Vuforia Engine packages by right-clicking in the Assets panel and selecting: Import Package > Custom Package...
With the setup complete, I created three main scenes for my part of the project: OnboardingScene, HomeScene, and ARScene.

|
| Fig.4.2 Scenes |
OnboardingScene
In the OnboardingScene, I created a GameObject named StartButtonManager and attached the StartButton.cs script to it. This script is responsible for navigating the user to the HomeScene when the “Start” button is clicked.
Additionally, I added a pop sound effect to enhance user feedback. This sound plays whenever a button is clicked throughout the app, creating a more engaging experience.

|
| Fig.5.1 OnboardingScene |

|
| Fig.5.2 StartButton.cs |
To enable the “Start” button functionality, I dragged the StartButtonManager GameObject into the OnClick() event field in the Inspector of the StartBtn, and set it to Start Button > OnClickStart ()

|
| Fig.5.3 StartBtn Inspector |
HomeScene
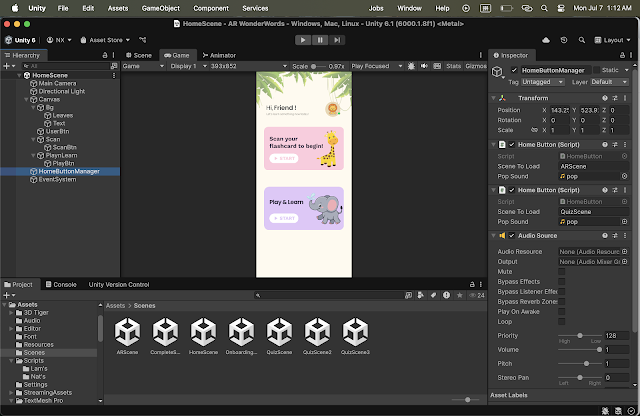
In the HomeScene, I created a GameObject named HomeButtonManager and attached the HomeButton.cs script to handle navigation. This script allows the user to access both the ARScene and the QuizScene.
To enable navigation to two different scenes, I duplicated the HomeButton.cs script component twice in the Inspector of HomeButtonManager, each one configured to load a different scene upon button click. Additionally, I added an AudioSource component to the scene for button sound effects. I made sure to untick "Play On Awake" to prevent the sound from playing automatically when the scene loads.

|
| Fig.6.2 HomeButton.cs |
Finally, I dragged the HomeButtonManager into the OnClick() field of both the ScanBtn and PlayBtn. I then set each button to trigger the method:
HomeButton > OnButtonClick().
ARScene
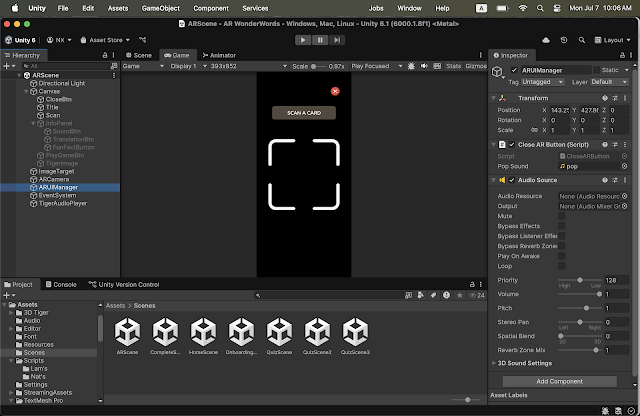
In the ARScene, I added a GameObject named ARUIManager and attached the CloseARButton.cs script to it. This script allows users to return to the HomeScene when they click on the CloseIcon button.
This provides a simple and intuitive way for users to exit the AR view and return to the main menu.

|
|
Fig.7.1 ARScene (ARUIManager) |

|
| Fig.7.2 CloseARButton.cs |
Once the user scans the TigerCard, an InfoPanel appears on the screen, while the Title and ScanIcon are hidden to reduce visual clutter. A 3D model of a tiger is planned to appear at the center of the screen, but this will be implemented in Task 4.
I also created a GameObject called TigerAudioPlayer and attached the TigerSoundButton.cs script to manage the three interactive buttons within the InfoPanel:
- SoundBtn: Plays a tiger’s roaring sound.
- TranslationBtn: Reads aloud the translation of “tiger” in Malay.
- FunFactBtn: Shares a fun fact about tigers.
These audio buttons help enhance engagement and support multi-sensory learning, especially for young users.

|
| Fig.7.3 ARScene (TigerAudioPlayer) |

|
| Fig.7.4 TigerSoundButton.cs |
Next, I linked the three buttons in the InfoPanel to the corresponding functions in the TigerSoundButton.cs script. I did this by dragging the TigerAudioPlayer GameObject into the OnClick() event field of each button in the Inspector, and assigned the following methods:
- SoundBtn → TigerSoundButton > PlayTigerRoar()
- TranslationBtn → TigerSoundButton > PlayTranslation()
- FunFactBtn → TigerSoundButton > PlayFunFact()
This setup ensures that each button triggers the correct audio playback when clicked, creating an interactive and educational experience.

|
| Fig.7.5 SoundBtn Inspector |
After all three buttons in the InfoPanel (SoundBtn, TranslationBtn, and FunFactBtn) have been clicked, a PlayGameBtn will appear.
When the PlayGameBtn is clicked, it navigates the user to the QuizScene. To set this up, I dragged the TigerAudioPlayer GameObject into the OnClick() event field of the PlayGameBtn in the Inspector and assigned the method:
TigerSoundButton > GoToQuizScene().

|
| Fig.7.6 PlayGameBtn Inspector |
This ensures a smooth and interactive transition from the learning phase to the quiz activity.
What has not been done? (My part)
3D Tiger Model:
The 3D model of the tiger is not yet implemented. It is planned to be added in Task 4. Once the TigerCard is scanned, the model will appear in the center of the screen along with the InfoPanel, enhancing the AR experience visually.
Submission
Google Drive link: https://drive.google.com/drive/folders/14AWwRF0Ct3nkWCAo5Qu5vHl7pX6nGjw7?usp=sharing
Click HERE to view our Video Presentation:
Note: Xiang Lam is currently experiencing technical issues with her laptop and is unable to record audio. Please proceed to the video walkthrough (Fig.8.2) to view the full Unity prototype demonstration.
Fig.8.1 Video Presentation
Click HERE to view our Video Walkthrough:
Fig.8.2 Video Walkthrough
Reflection
Working on this AR project has been a really fun and meaningful experience for me. It was my first time combining design and development in Unity and Vuforia to build something interactive, and honestly, I learned a lot along the way.
At first, I was a bit nervous about using Unity because it felt quite technical, but as I went through each step: setting up scenes, writing simple scripts, managing button clicks, and adding sound, it started to make more sense. One of the moments that made me really proud was getting the AR scene to detect the TigerCard and show the InfoPanel with working sound buttons. It felt like all the small pieces I worked on were finally coming together.
I was in charge of the onboarding flow, home screen, and AR interaction, while my teammate handled the quiz part. Splitting tasks helped us stay focused, and I think we made a good team. We both had our own challenges, but we also helped each other whenever we got stuck. One thing we haven’t done yet is the 3D tiger model, which will be added later in Task 4. I’m actually nervous for that part because I think it’ll make the AR experience feel more alive but quite challenging.
Overall, this project taught me a lot about planning, problem-solving, and just figuring things out step by step. It made me realize how much I enjoy creating things that are both educational and fun. I'm looking forward to finishing the next part.


.jpg)

Comments
Post a Comment